
Happy Thursday everyone! It's time for CropStop Challenge #17-Nightingale Theme. Florence Nightingale's birthday is in May so to celebrate we want you to use a textured bird, birdcage, and/or bird's nest on your project. Since it's the end of the month, I decided to make two projects. One was actually started a while ago....I just had to finish it up. So, truth be told, I actually didn't start from scratch on both...for me that's close to impossible, LOL!
 Here are my measurements:
Base Piece: 3 1/2" x 12". It definitely helps to start off with a thick piece of designer paper that has a pattern on both sides. The beautiful paper I used came from DCWV Nana's Nursery Baby Boy pack. Unfortunately, it was white on the back so I had to cut a second piece of dp (the blue/white striped paper) to cover the inside.
Strips for the cage: 1/4' x 7". I cut 12 strips total. Once you cut all your strips, pierce one end of each strip about 1/2" down from the top to make a little hole for a brad (or in my case nail....keep reading). You also want to use a thicker weight dp with a pattern on both sides for the strips. If you try to glue two thick dp's together to make your strips, it becomes too thick to slide a brad through at the top of the strips. Yeah, I learned that the hard way! So instead of a brad, I had to use a nail to go through all my layers. I just added glue to each strip as I inserted the nail through so it would all stick together.
You will want to glue the bottom of your strips to the inside of your base piece about 1/2" down from the top. I used 12 strips and spaced them a little less than 1 inch apart. Don't forget you will have to overlap your base piece to glue it into a cylinder so don't glue your strips too close to the left and right edges. Then cover the strips with your second designer paper base (if you're using one).
Once that is dry, glue the ends of the base together to form your cylinder and let dry. Now, you want to take a brad and insert it through the holes of each strip to form the cage. To layer my strips I started on one side and then grabbed the strip directly across from the one I started with to go underneath. Then I grabbed the strip to the left and then the one directly across from that one. I hope that makes sense. Once you secure the brad through all the layers, squish down the strips from the top so it pushes them outwards a little.
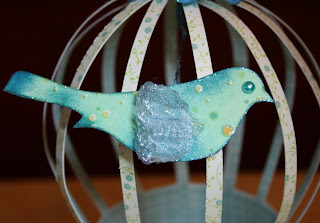 You will then want to make a bird using a stamp or die-cut. I used a CTMH bird stamp from the Sophia Workshop on the Go (B1379). I stamped the bird, then enlarged it 200% on the copier to get my template. I traced the bird twice onto some spotted dp from DCWV Nana's Nursery. The dp had yellow, green & blue dots and glitter on it, but the background was white. I took some green and blue chalk and covered up all the white. I glued my yarn between my bird layers, then went around the edges with Broken China Distress Ink and Stardust Stickles. I added Jolee's Blue Pearls for the eyes (one on each side). To make his wings, I took apart a fabric Recollection flower and squished the petals together and glued a wing to each side.
 For the base, I used the Martha Stewart Blossom Trim Deep Edger and punched the border from green dp. I adhered the green dp border and then punched another blossom border from white cardstock. I cut out all the white flowers, and then used my McGill flower making tool (with the ball at the end) to make them curl up. I attached my flowers first and then added Jolee's Blue Pearls to each center.
 I glued a blue fabric Recollection flower to the top. I added a Wild Orchid Craft white rose to the middle of the blue flower. All the edges of the fabric flower and rose are covered in Stardust Stickles.
Here's the back view:
 You can see the flower border goes all the way around and the bird is the same on the reverse side.
 My next project is a Peacock Easel Card Drawer Box:
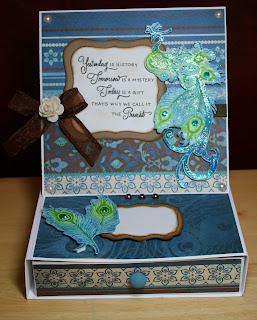 The paper is from CTMH Magnifique Level 2 (X7127B). The peacock and peacock feathers are from CTMH Circle of Love stamp set (D1438). The sentiment is from CTMH The Present stamp set (D1436).
 I used Spellbinders Labels One to cut out the sentiment, and inked around the edges with Vintage Photo Distress Ink. I sponged blue and green ink onto the peacock stamp, "huffed"on the stamp to moisten the ink and then stamped on white cardstock. I smeared blue and green chalk over and around the image before I cut it out so no white was showing. I added Stardust Stickles and blue rhinestones to certain areas of the peacock. The sheer brown, ruffle-edge ribbon came from CropStop. The white rose is from Wild Orchid Crafts. I added white CTMH pearls to the corners.
 I punched the bottom sentiment area with EK Success Real Estate Sign punch. The edges are inked with Vintage Photo Distress Ink. The chocolate pearls are from CTMH. I painted the wooden knob with blue acrylic paint and glued it to the front of the drawer using my favorite glue---FABRI-TAC. It's awesome and holds extremely well. It's like hot glue in a bottle!
Here's another view with the drawer open:
 I hope you enjoyed my projects. I can't remember who's tutorial I used for the drawer box. If you do a google search for Easel Card Drawer Box I'm sure several tutorials will pop up. :)
Thanks for joining me this month for our Spellbinders Tribute to my CropStop team member Gloria who made their Design Team. We hope you join our challenge at CropStop this week and remember, if you use a Spellbinder product be sure to mention it in your post so you can be eligible for CropStop's second drawing!
Sending hugs your way!
Rosie :)
My two projects are a Paper Birdcage and a Peacock Easel Card Drawer Box:

I saw this awesome paper birdcage on the back page of my April 2011 Scrapbooks Etc. magazine and thought it would be perfect for this challenge. It listed the designer as Laurie Cinotto. Her blog is http://www.lalalaurie.com. I couldn't find any instructions on her blog so I made up my own dimensions.
 Here are my measurements:
Base Piece: 3 1/2" x 12". It definitely helps to start off with a thick piece of designer paper that has a pattern on both sides. The beautiful paper I used came from DCWV Nana's Nursery Baby Boy pack. Unfortunately, it was white on the back so I had to cut a second piece of dp (the blue/white striped paper) to cover the inside.
Strips for the cage: 1/4' x 7". I cut 12 strips total. Once you cut all your strips, pierce one end of each strip about 1/2" down from the top to make a little hole for a brad (or in my case nail....keep reading). You also want to use a thicker weight dp with a pattern on both sides for the strips. If you try to glue two thick dp's together to make your strips, it becomes too thick to slide a brad through at the top of the strips. Yeah, I learned that the hard way! So instead of a brad, I had to use a nail to go through all my layers. I just added glue to each strip as I inserted the nail through so it would all stick together.
You will want to glue the bottom of your strips to the inside of your base piece about 1/2" down from the top. I used 12 strips and spaced them a little less than 1 inch apart. Don't forget you will have to overlap your base piece to glue it into a cylinder so don't glue your strips too close to the left and right edges. Then cover the strips with your second designer paper base (if you're using one).
Once that is dry, glue the ends of the base together to form your cylinder and let dry. Now, you want to take a brad and insert it through the holes of each strip to form the cage. To layer my strips I started on one side and then grabbed the strip directly across from the one I started with to go underneath. Then I grabbed the strip to the left and then the one directly across from that one. I hope that makes sense. Once you secure the brad through all the layers, squish down the strips from the top so it pushes them outwards a little.
 You will then want to make a bird using a stamp or die-cut. I used a CTMH bird stamp from the Sophia Workshop on the Go (B1379). I stamped the bird, then enlarged it 200% on the copier to get my template. I traced the bird twice onto some spotted dp from DCWV Nana's Nursery. The dp had yellow, green & blue dots and glitter on it, but the background was white. I took some green and blue chalk and covered up all the white. I glued my yarn between my bird layers, then went around the edges with Broken China Distress Ink and Stardust Stickles. I added Jolee's Blue Pearls for the eyes (one on each side). To make his wings, I took apart a fabric Recollection flower and squished the petals together and glued a wing to each side.
Now you insert your bird through the bottom of the cage and wrap your string around the brad on the inside of the cage. Make sure you use some glue to secure the string. Since I had to use a nail, I covered the bottom of the nail with glue, and starting from the bottom I wrapped it upwards around the nail.
 For the base, I used the Martha Stewart Blossom Trim Deep Edger and punched the border from green dp. I adhered the green dp border and then punched another blossom border from white cardstock. I cut out all the white flowers, and then used my McGill flower making tool (with the ball at the end) to make them curl up. I attached my flowers first and then added Jolee's Blue Pearls to each center.
For the sentiment, I punched out the small Spellbinder Fleur de Lis Pendant from shiny, bronze paper (my stash). I also punched out a 1 7/16" circle to go on top. Then I stamped the circle border and sentiment from Fiskars Wishes All Around stamp set using Broken China Distress Ink. I added Stardust Stickles around all the edges. I used pop-dots behind the sentiment piece and behind the Fleur de Lis Pendant to give it some added dimension.
 I glued a blue fabric Recollection flower to the top. I added a Wild Orchid Craft white rose to the middle of the blue flower. All the edges of the fabric flower and rose are covered in Stardust Stickles.
Here's the back view:
 You can see the flower border goes all the way around and the bird is the same on the reverse side.
 My next project is a Peacock Easel Card Drawer Box:
 The paper is from CTMH Magnifique Level 2 (X7127B). The peacock and peacock feathers are from CTMH Circle of Love stamp set (D1438). The sentiment is from CTMH The Present stamp set (D1436).
 I used Spellbinders Labels One to cut out the sentiment, and inked around the edges with Vintage Photo Distress Ink. I sponged blue and green ink onto the peacock stamp, "huffed"on the stamp to moisten the ink and then stamped on white cardstock. I smeared blue and green chalk over and around the image before I cut it out so no white was showing. I added Stardust Stickles and blue rhinestones to certain areas of the peacock. The sheer brown, ruffle-edge ribbon came from CropStop. The white rose is from Wild Orchid Crafts. I added white CTMH pearls to the corners.
 I punched the bottom sentiment area with EK Success Real Estate Sign punch. The edges are inked with Vintage Photo Distress Ink. The chocolate pearls are from CTMH. I painted the wooden knob with blue acrylic paint and glued it to the front of the drawer using my favorite glue---FABRI-TAC. It's awesome and holds extremely well. It's like hot glue in a bottle!
Here's another view with the drawer open:
 I hope you enjoyed my projects. I can't remember who's tutorial I used for the drawer box. If you do a google search for Easel Card Drawer Box I'm sure several tutorials will pop up. :)
Thanks for joining me this month for our Spellbinders Tribute to my CropStop team member Gloria who made their Design Team. We hope you join our challenge at CropStop this week and remember, if you use a Spellbinder product be sure to mention it in your post so you can be eligible for CropStop's second drawing!
Sending hugs your way!
Rosie :)
7 comments:
Fab projects! Love the paper birdcage!
Rosie, your bird cage ia adorable. Stunning set!
Hugs
Agnes
I just LOVE your take on this challenge, Rosie. That bird cage is just gorgeous.
Awesome! Your bird cage is very pretty and how ingenious of you to create your own.
Hugs, Cami
My goodness, girl, you did an excellent job! I love the bird cage - so unique and different from anything else I've seen so far. And don't even get me started on the easel card drawer box, that one is simply stunning!!! I LOOOOOVE it!!! Hugs!
Both of your creations are beautiful. You did a wonderful job with both of them. I also want to compliment you with your card you made before, Rainbow bubbling Tilda. I love everything what you did with her and with the rest of the card.
xxx Sylvia
Very neat projects. Works of art both.
Post a Comment