Tuesday, December 29, 2020

Dies R Us: MEMORY BOX STITCHED CIRCLE CABIN Shaker Card

 Happy Tuesday everyone! It's Rosie here today showing how I created this fun shaker card. Shaker cards are quite the eye candy and your recipient will love this card! I kept it mostly white for the snow effect...only adding color to certain elements. 

Let's get started!

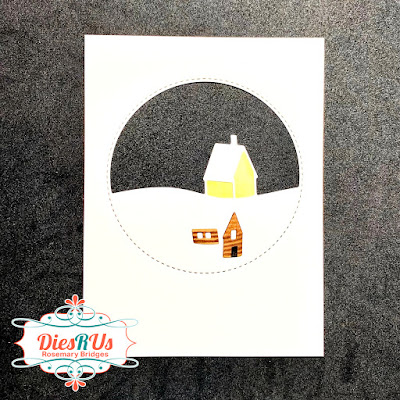
Step 1: I cut white cardstock using the Stitched Circle Cabin Die. Be sure to keep the cabin cut-outs (front and side of cabin).

 
Step 2: My card base is 4.25 x 5.5. The blue cardstock is 4 x 5.25, and I trimmed the cabin cardstock to 3.75 x 5. I also cut a blue circle and clear acetate circle a little bigger than the cabin die-cut (about 3.5).

 
Step 3: I traced around the cabin onto scrap paper, and then colored it yellow. I fussy cut the cabin out slightly smaller than my outline.


Step 4: I colored the cabin cut-out pieces using Copic Markers to look like logs (E42, E44, E77). I used a black pen to draw in a door.


Step 5. I glued the yellow scrap piece on the backside of the cabin so the yellow showed through the die-cut.


Step 6: Then I glued the cabin pieces on top of the yellow so it would look like lights were on inside the cabin. If you want a sentiment on the front of your card, this is the point you want to stamp it (I forgot to take a picture of that step) before you add foam tape to the back. I stamped LET IT SNOW from the Lawn Fawn Snow Cool Stamps.


Step 7: Next, I flipped the panel over and glued the acetate to the back side of the cabin. I cut pieces of foam tape and placed it around the acetate. I didn't have any snowflake shaker elements, but I did have this bottle of sugar sprinkles so I decided to use them!
 

 Step 8: I filled in the open area with the snowflake sugar sprinkles, and pulled out any ones that were broken.


Step 9: I then pulled off the adhesive backing on the foam tape around the circle and placed the blue die-cut circle on top to seal the shaker. Next, I added more foam tape on the white cardstock.


Step 10: I assembled the card by placing the shaker panel on top of the blue cardstock. Then I used Scor-tape to adhere the blue cardstock to the card base.


FUN, right?! I hope this inspires you to create your own shaker cards!

Here are the products I used:

Memory Box Stitched Circle Cabin Die


Don't forget to come join in the fun at the Dies R Us Challenge Blog.  There's a new challenge theme offered on the 1st and 15th of each month, and one lucky randomly drawn winner will receive a gift voucher prize to the Dies R Us Store.  For your convenience, all the important Dies R Us links are provided below.

Thank you for stopping by! Have a great week!

Tuesday, December 15, 2020

I Am Roses Season's Greetings BLOG HOP!


WELCOME to the I Am Roses "Season's Greetings" Blog Hop!

Season's Greetings from all of us at I AM ROSES! There will be no IAR Challenge this month but we have a fabulous blog hop for you.
 We'd like to THANK YOU from the bottom of our hearts for all your support this year! There will be FOUR Prizes up for grabs!

(1) $50 Voucher
(1) $30 Voucher
(2) $25 Voucher

Are you ready to win some beautiful I Am Roses flowers?

Here’s how to play:
  • Hop along to each of the Designers’ blogs and be sure to comment on their individual IAR Blog Hop Post
  • There are 4 HIDDEN BLOG CANDY PRIZES up for grabs spread throughout our  Designers’ blogs!
  • Be sure to Subscribe/Follow the I Am Roses Challenge Blog
  • Commenting along the way highly increases your chance of winning a Prize Voucher.
  • Comments will be CLOSED on 11:59pm PST on Monday December 21st (This blog hop has a duration of one week)
  • We will be randomly selecting 4 winners from the comments made on our Designers' blogs and will announce the winners here on the I Am Roses Challenge Blog on January 1st!
Let's get this hop started!
Today, I created this card using an awesome digi from Conie Fong called Susie Snowflake. Isn't she beautiful?! I decided to stick to a teal/mint and white color scheme, which I think worked perfectly with this image.


The beautiful paper is called Eucalyptus from The Paper Studio (Hobby Lobby). I added some teal/gold embossing enamel around the edge of my image.
 
 
Enjoy the hop! Please be sure to head back to the IAR Blog and leave a comment on their hop post when you finish hopping!

GOOD LUCK!!
Rosie

Sunday, December 13, 2020

Polka Dot Orchard: CALLING ALL REINDEER SHADOW BOX

Happy Sunday everyone! I'm so in love with the Polka Dot Orchard CALLING ALL REINDEER Digital Stamp Set that I created another Home Decor item, but this time I went even bigger! I found an awesome 12x12 Shadow Box Frame at Walmart and created this for one of my friends. She always gifts me something at Christmas and I rarely make anything for her.....I'm awful! But now that I live closer to her, I can just drive up the street and drop this off as a surprise!

I found the 12x12 background paper and small jingle bells at Hobby Lobby. I printed the image close to 8 1/2 x 11 and fussy cut it out. Then I just glued it to the buffalo plaid paper. To finish it off, I added the red jingle bells to the inside of the frame and then placed the paper and frame backing on and voila....my project was finished.  This project came together really quickly!
 

Please come share your creations with us on the
 Friends of Polka Dot Orchard Facebook Page so we can Ooooh and Ahhhh over them!  Have a great Sunday! 
 
Hugs,
Rosie

Saturday, December 12, 2020

TLC Designs Shop: SNOW FAMILY FUN and a SALE!

 Happy Saturday everyone! I'm in the middle of Christmas card crunch time. You know that feeling? When it's right around the corner and you realize you have nowhere near the amount of cards you need. Well, TLC Designs Shop has come to the rescue! They have created two new digi sets that are pre-colored and allow for some quick and easy mass cardmaking.

 
I combined two sets: Snow Family Fun Tree and Snow Family Fun Mail. This scene took me about 30 minutes to create in MS Word. And the entire card only took a few minutes to put together. Talk about easy peasy!


Oh and guess what? Tammy is having a sale! Now is the best time to grab your favorite stamps, dies and digis! 

Have a great weekend!

Hugs!
Rosie

Rachelle Anne Miller: KOALA CHRISTMAS

 Happy Saturday everyone! I'm back today sharing my latest card for Rachelle Anne Miller using this adorable digital stamp called KOALA CHRISTMAS. Aren't they adorable decorating their Christmas tree? I think this image is so cute!


COPICS:
Koalas: C1, C2, C3, C5, C7, N0, N2
Tree: YG25, G46, E44
Pinecones: E42, E43, E44
Stars: Y11, Y21, YR21, YR23
Sky: BG10, BG32, BG72, BG75, BG78
Presents: B32, BG72, BG75, C7

If you are part of the Stamp Junkies Facebook group, you've probably seen posts about "that" paper. It's become a popular thread in that group. I recently went to Hobby Lobby and found "that" paper and decided it was perfect for this image! It's called Eucalyptus from The Paper Studio. The ribbon was part of a pajama set. It was tied around the set as part of the packaging. I saved it years ago and it finally came in handy. 
 
 
I hope you come join us on the Rachelle Anne Miller Digital Stamps Facebook Group to share your fabulous creations! Be sure to subscribe to her newsletter also because she will have special sales throughout the year just for email subscribers! 
 
Remember, the prices in her store are in Australian dollars so if you live in the U.S.A., you will pay a lower amount.
 
Have a great weekend!
Rosie

Friday, December 11, 2020

Jaded Blossom: December Winter Release Blog Hop!

Hey Everyone! Welcome to Jaded Blossom's December Winter Release Blog Hop.  

Now if you're here from Jamie's Blog you're in the right place. If you're just passing through start at the beginning because you don't want to miss a thing. I also have the complete line up at the bottom.

For my project today, I created a Snowman gift set using a a large glass jar. I added in a snowman mug, along with all things snowmen! I found snow hershey kisses, snowman hot cocoa, chocolate covered marshmallow snowmen, peppermint snowmen, and snowmen gummies.


I created a coordinating mini card tag using the the large die from the Scallop Rectangles Die 2 (scored in half), Birch Tree Stencil, and Cozy Vibes Stamp Set and Snowman Blend Stamp Set. I punched a hole in the corner and added twine and jingle bells. The snow under the mug was created using Liquid Applique.


And of course we have to have a deal for you right? This weekend only you can get the entire release package for $86.99

Regular Price for the Release Package is $93.99

 Free Stencil for customers that spend $40 or more before tax and shipping! FREEBIE is only available until Sunday 12/13 11:59am pst or while supplies last.

BIRCH TREE STENCIL

Customer Treat

BLOG CANDY

1 Lucky Winner will get to pick a stamp set of their choice!
Just leave a comment on all the blogs along the hop!
The more blogs you comment on the more chances you have to win!

Now on to the HOP....

Next up is Candace!

Just in case you get lost here is the Entire Line Up:

Thursday, December 10, 2020

Jaded Blossom: Winter Release Sneak Peek Day 4 FREEBIE

 Happy Thursday everyone! Today is Day 4 of Sneak Peeks for the Jaded Blossom Winter Release If you LOVE everything you have seen so far this week, then you definitely want to purchase the Gotta Have it Now Package, which will return to the Jaded Blossom Store on Friday. 

Today, I'm sharing a project featuring the BIRCH TREE STENCIL FREEBIE.


 The Birch Tree Stencil is only FREE with the Winter Stamp Release 2020 Package orders! Available Friday through Sunday- while supplies last!

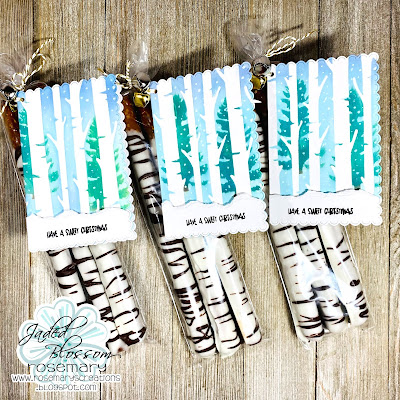
I decided to make some "birch tree" pretzel rods and used this awesome stencil to create mini tag cards to wrap around the pretzel bags. These treats come together quickly. All you need are some long pretzels and almond bark (white chocolate and milk chocolate). I melted the white chocolate in the microwave and then used a spoon to cover the pretzel sticks. Next, I used a fork to drizzle the milk chocolate over the top. Once the chocolate has set, I load 3 at a time into pretzel bags. 


 To create the tag card, I used the large rectangle from the Scallop Rectangle Die 2. I scored it in half to form a mini card. Then I taped the Birch Tree Stencil on top of the card. Next, I taped the Tree Stencil on top of the Birch Stencil. I inked up one of the trees using Pine Needles Distress Oxide Ink, and then moved it to ink up a second tree. I gently pulled off the tree stencil and used a wet wipe to carefully wipe off the green ink from the Birch Tree Stencil. Next, I rubbed Stormy Sky Distress Oxide Ink and Tumbled Glass Distress Oxide Ink to create the sky. I cut a separate Scallop Rectangle and tore it to create the snowy ground. I used a sentiment from Gingerbread Baking Co., and raised that panel on foam tape. I punched a hole in the corner and tied it to the top of the bag with some jingle bells.

I hope you liked this project. They make great gifts and stocking stuffers! See you here tomorrow for our fabulous BLOG HOP!

Hugs,
Rosie

Wednesday, December 9, 2020

Jaded Blossom Winter Release: Sneak Peek Day 3

 Happy Wednesday everyone! Today is Day 3 of Sneak Peeks for the Jaded Blossom Winter Release! Once again, I LOVE everything in this release and I know you will too!

We have our Gotta Have it Now Package for $86.99

Winter 2020 Release will include:

4 - 4 x 6 Stamp Sets
1 - New Dies
1 - New Stencil
1 - Freebie Stencil

Ala Carte Items available on Friday 12am PST 

NO PREORDERS! NO BACKORDERS!
No waiting WEEKS for your stamps. 
This Package is only available until Wednesday 11:59pm PST. It will return to the store on Friday at 12am PST during our Stamp Release Blog Hop!
*Freebie Stencil - Free While Supplies Last.*

Regular price for the release package is $93.99

 Today we are revealing 2 new Stamp Sets!


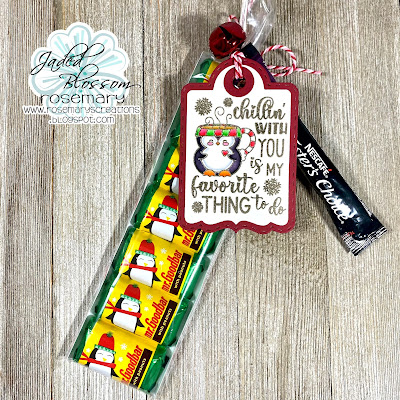
I created two tags for these Hershey Miniature chocolate gifts using Snowman Blend Stamp Set. I cut out the tag shape from hot press watercolor paper using the Treat Tag Die. Then I stamped the images using Versamark Watermark Pad and heat embossed using silver embossing powder. I used Zig Watercolor Markers and a paintbrush to color the images.


These Hershey Miniatures are a little bit wider than the nuggets. I create a paper holder for them cutting a sheet of Christmas paper to 2.5 x 7. I then scored 1/4 inch from both long sides. It fit perfectly inside these pretzel bags. I also added a pouch of instant coffee and a red jingle bell. 


I absolutely LOVE the products from Jaded Blossom especially for creating awesome favors for family and friends. Tomorrow I'll be sharing my project featuring the Birch Stencil Freebie and Friday we have our Blog Hop!
 
Hugs,
Rosie

Tuesday, December 8, 2020

Jaded Blossom Winter Release: Sneak Peek Day 2

 Happy Tuesday! Today is Day 2 of Sneak Peeks for the Jaded Blossom Winter Release! Once again, I LOVE everything in this release and I know you will too!

We have our Gotta Have it Now Package for $86.99

Winter 2020 Release will include:

4 - 4 x 6 Stamp Sets
1 - New Dies
1 - New Stencil
1 - Freebie Stencil

Ala Carte Items available on Friday 12am PST 

NO PREORDERS! NO BACKORDERS!
No waiting WEEKS for your stamps. 
This Package is only available until Wednesday 11:59pm PST. It will return to the store on Friday at 12am PST during our Stamp Release Blog Hop!
*Freebie Stencil - Free While Supplies Last.*

Regular price for the release package is $93.99

 Today we are revealing 1 New Stencil and 1 new Stamp Set!

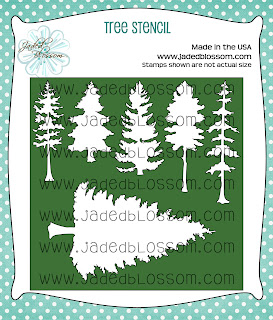
Tree Scene $15.99 

Tree Stencil $5.99

Today I created two cards using gold and silver embossing powders. I love the elegant look of embossed cards. Hubby even said these look professional...like cards you would buy at the store. I think if you created several, they would be great as a boxed set! The sentiment is from an older set called Winter Panels.
 

This card was a little bit more complicated because I was trying to put the deer in the middle of the embossed trees. I stamped the deer on a post-it note and used really sharp scissors to fussy cut the deer. It works best to stick the deer to the stamp instead of the paper, apply embossing ink to the tree stamp, and then carefully pull the deer paper off the stamp and then stamp onto the paper. Apply embossing powder and use a small brush to get rid of excess powder and heat-set.
 

My second card came together a lot quicker because it was a larger image on the stencil. I just used a makeup brush to smear the embossing ink over the stencil, sprinkled on the embossing powder and heat set....easy peasy!


I had so much fun playing with these products from Jaded Blossom's Winter Release! I can't wait to show you everything that's coming all week long!

Hugs,
Rosie